Create App to Display and Log Data from Serial Port GPS Device
This example shows how to create an app that connects to a serial port GPS device, reads and visualizes the data, and logs the data from the device to a file.
To run the app in this example, you need a GPS device that connects to a computer via serial port or USB virtual serial port and returns NMEA 0183 data. However, you can apply the same approach to other devices that use serial port communication.
Design App Layout
Lay out the app in App Designer to provide controls for users based on the app goals. This app contains different layout sections for the different goals:
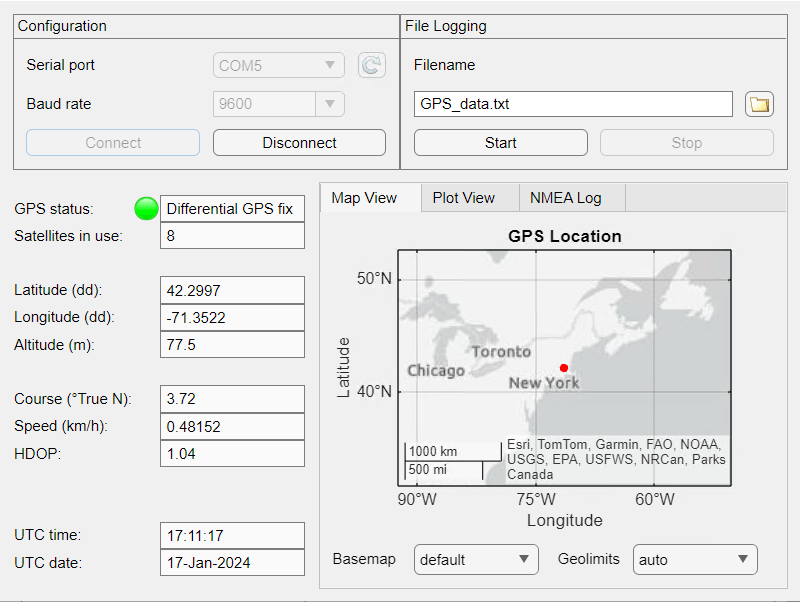
Connect to device — Create a panel with components for users to configure their device connection.
Log data over time — Create a panel with components for users to start and stop data collection over a period of time and indicate the name of a file to store the logged data.
View live data in app — Create fields on the left of the app to display live information about the device connection, such as the GPS status and location.
Visualize data — Create a tab group with data visualization options, such as a view of the location data on a map or of the data over time.
Write App Code
Write your app code to perform these key tasks based on user interactions:
Connect to serial port GPS device — Use the device configuration options to connect to a device using
serialport.Get live data from device — Use a callback set with
configureCallbackto control the asynchronous behavior in the app.Log data to file — Write raw and processed data to two different files within the callback.
Plot data in various charts — Update the live views in the app within the callback.
In addition, manage your app code to:
Enable and disable app components to guide the user in the app workflow
Display errors in the app to alert the user to issues
Connect to Serial Port GPS Device
When a user clicks the Connect button, use the Serial port and Baud rate values to connect to the device.

First, create a private property named SerialPort to store the serialport object. You can use this property to access the object from anywhere in your code. Select Property > Private Property from the Editor tab of the App Designer toolstrip to add the property.
To connect to a device when a user clicks the Connect button, use the ConnectButtonPushed callback. In the callback, connect to the specified serial port GPS device using the serialport function and the SerialportDropDown and BaudrateDropDown values. Save the serialport object in the app.SerialPort property.
app.SerialPort = serialport(app.SerialportDropDown.Value,str2double(app.BaudrateDropDown.Value));
To disconnect the app from the serial port device when a user clicks Disconnect, use the DisconnectButtonPushed callback. In the callback, use the delete function to delete the serialport object and close the connection to the device. You cannot use the clear function to delete the object because it is stored in a property.
function DisconnectButtonPushed(app, event)
    delete(app.SerialPort)
    StopButtonPushed(app);
    setAppState(app,"DeviceSelection");
end
Get Live Data from Device
After the device is connected, you can get the live data by creating a callback that executes when the device receives a new line of data.
Create a function named serialportCallback in App Designer that handles new data from the device. This function must contain the app object as the first input argument to provide access to app properties and components. Define the callback to also accept the serialport object (obj) and serial port callback event data (evt).
function serialportCallback(app,obj,evt)
    inputline = readline(obj);
    eventtime = datetime(evt.AbsTime,Format='yyyy-MM-dd''T''HH:mm:ss.SSS');

    latestdata = processData(app,inputline,eventtime);

    if app.Logging
        logData(app,inputline,latestdata);
    end

    updateLiveView(app)
end
You can set the serialportCallback callback function to trigger whenever a terminator is available to read using the serialport configureCallback function. The configureCallback function automatically passes the source object and event data to its callback, so you can specify the callback as an anonymous function.
configureCallback(app.SerialPort,"terminator",@(obj,event) serialportCallback(app,obj,event))
Log Data to File
Users can write the data to a log file by starting and stopping the logged data collection and specifying the name of a file to store the data.

Write the raw and processed data in two different files:
Raw NMEA data — Log raw GPS sentence data line-by-line as the app receives it by using
writelines.Processed data — Log processed data as a comma-separated values (CSV) row after receiving all of the GPS sentence data for a single timestamp by using
writecell.
Create a function named logToFile to log data in these two formats.
function logToFile(app,inputline,row)
    dt = row{1};
    writelines(string(dt)+" "+inputline,app.RawFilename,WriteMode="append")
    if app.CycleEnd
        writecell(row,app.FilenameEditField.Value,WriteMode="append")
    end
end
If your device requires an increased logging rate, consider using low-level file I/O operations instead. For more information, see Low-Level File I/O.
Plot Data in Various Charts
Visualize the data with various charts on different tabs:
Plot location data on a live map
Plot data over time on a line chart
Plot Location Data on Map
Plot the data on a map using geographic axes. Unlike other components, you must create geographic axes programmatically by calling the geoaxes function in your app startupFcn. To create a startupFcn callback, navigate to the Callbacks tab of the main app component in the Component Browser and select <add StartupFcn callback>. In your startupFcn code, store the geographic axes and plot objects in app properties.
app.MapViewAxes = geoaxes(app.MapGrid);
app.MapViewAxes.Layout.Row = 1;
app.MapViewAxes.Layout.Column = [1 5];
app.MapViewPlot = geoplot(app.MapViewAxes,NaN,NaN,"r.-");
To update the plot with new data, update the LatitudeData and LongitudeData properties of the geographic plot in the updateLiveView function.
set(app.MapViewPlot,"LatitudeData",latdata,"LongitudeData",longdata);
Plot Data over Time
To display data over a time span, store the data in an app property and update this property as the app receives new data. For example, to plot the most recent 10 minutes of GPS location data, create an app property named DataTable. In a processData function, create and store a new row of data whenever the app receives new data from the device.
newrow = {dt}
...
newrow = {newrow{1}, app.FixType, app.Latitude, app.Longitude, app.Satellites, app.Altitude, app.HDOP, app.Course, app.Speed, app.UTCDate, app.UTCTime};
app.DataTable = [app.DataTable; newrow];
Read the DataTable property in the updatePlotView function to display the data.
function updatePlotView(app)
    filter = seconds(datetime("now")-app.DataTable.ComputerTime) < app.XDataDropDown.Value;
    x = app.DataTable.ComputerTime(filter);
    y = app.DataTable{filter,app.YDataDropDown.Value};
    set(app.Plot,"XData",x,"YData",y);
end
Optimize Graphics Performance
To optimize performance and reduce the time spent updating app graphics objects, update only the currently displayed graphics objects based on the open tab in the tab group. Use switch/case statements in the updateLiveView function to decide which graphics objects to update.
switch app.TabGroup.SelectedTab
    case "MapViewTab"
        updateMapView(app,app.Logging);
    case "PlotViewTab"
        updatePlotView(app);
    case "NMEALogTab"
        updateNMEALog(app);
end
Enable and Disable Components
You can enable and disable certain components of the app depending on where the user is in the workflow. For example, when the user is selecting the device, you can enable the Serial port drop-down component, Baud rate drop-down component, and Connect button. However, once the device is connected, you can disable those components and enable the Disconnect button.
When a user interacts with this app, there are a few states that the app can appear in.
Device selection — The app is not connected to a device. Users can configure and connect to a device. Other options are disabled.
Device connected — The app is connected to a device. Users can view the live data, interact with the visualizations, or disconnect from the device.
Waiting for data — The app is waiting for new data from the connected device, and users can view the existing data.
Data Acquisition — The app is processing and logging new data from the connected device, and users can view the new data.
To control which components are enabled, create a helper function named setAppState that sets the Enable property of the components.
function setAppState(app,state)
    switch state
        case "DeviceSelection"
            app.SerialportDropDown.Enable = "on";
            app.ConnectButton.Enable = "on";
            app.DisconnectButton.Enable = "off";
            ...
        case "Connected"
            ...
        case "WaitForData"
            ...
        case "Logging"
            ...
    end
end
Call this helper function when you want to change the enabled buttons, such as after successfully connecting to a GPS device. To avoid a delay between setting the Enable property of a component and when the component appears as enabled or disabled in the app, use drawnow.
function ConnectButtonPushed(app, event)
    setAppState(app, "Connected");
    drawnow
    ...
end
Display Errors in App
Set up in-app alerts to notify users of errors that occur while they use the app, rather than showing these errors in the Command Window. Wrap operations susceptible to user input errors within try/catch statements. For example, if an error occurs during device connection, use an alert dialog box to inform the app user of the error.
try
    app.SerialPort = serialport(app.SerialportDropDown.Value,str2double(app.BaudrateDropDown.Value));
catch ME
    uialert(app.UIFigure,ME.message,"Serialport Connection Error",Interpreter="html")
    setAppState(app,"DeviceSelection");
    return
end
Additionally, you can use the uialert function to enforce app expectations. For instance, to ensure app users log only to .txt files, use uialert to simulate an error and flag the restriction.
[filepath, name, ext] = fileparts(filename);
if ~strcmpi(ext,".txt")
    uialert(app.UIFigure,"File must be in .TXT format","File Log Error")
    ext = ".txt";
end
Run App
To run the app, click the Run button in App Designer. In the app, select a GPS device connected to your computer via serial port or USB virtual serial port. Then click Connect. To start logging to a file, specify a file name and use the Start and Stop buttons to collect the data.
Load the logged data into MATLAB using readtimetable.
data = readtimetable("GPS_data.txt")
Run App Without GPS Device
If you do not have a physical GPS device, an alternative method for running the app requires two serial ports or virtual serial ports connected to each other via a null modem cable. Use one port to simulate a GPS device by transmitting a raw log data file and the other port in a separate MATLAB session to receive data using the app.
From a separate MATLAB session, open the attached replayGPSLogData script for editing. In the script, specify the serial port to use and the raw log data file name. Then, run the script.
edit replayGPSLogData
See Also
Related Topics
You can also select a web site from the following list:
Americas
- América Latina (Español)
- Canada (English)
- United States (English)
Europe
- Belgium (English)
- Denmark (English)
- Deutschland (Deutsch)
- España (Español)
- Finland (English)
- France (Français)
- Ireland (English)
- Italia (Italiano)
- Luxembourg (English)
- Netherlands (English)
- Norway (English)
- Österreich (Deutsch)
- Portugal (English)
- Sweden (English)
- Switzerland
- United Kingdom (English)