Accelerating Flight Vehicle Design
By Arkadiy Turevskiy, MathWorks, Stacey Gage, MathWorks, and Craig Buhr, MathWorks
Designing a new or modifying an existing flight vehicle is a complex, time-consuming process that brings both technical and process challenges. For example, how can engineers quickly determine which geometric configuration best satisfies performance requirements? When several different groups are responsible for different parts of the workflow (evaluating geometric configurations, designing control laws, building a model), and each group uses different tools, how can the teams communicate and work together efficiently to meet deadlines?
Using the design of a new light aircraft1 as an example, this article shows how you can use MathWorks products to address these and other aircraft design challenges.
An Iterative Design Process
The multiple steps involved in designing a flight vehicle design generally fall into one of the following stages:
- Define the vehicle's geometry
- Determine the vehicle's aerodynamic characteristics
- Create a simulation to verify the design
- Design flight control laws
- Create a hardware-in the-loop system to test real-time performance
- Build hardware and software and perform flight testing
- Analyze and visualize flight test data
The design process is iterative; engineers will try out many vehicle configurations before deciding on the final one. Ideally, iterations will occur before any hardware is built. One challenge here is to go through the iterations quickly. Typically, different groups have to work on different steps of the process. Effective collaboration among these groups and the right set of tools are essential to addressing this challenge.
Designing a Lightweight Four-Seater Monoplane
Performance specifications for our sample aircraft include level cruise speed, acceptable rate of climb, and stall speed. For illustration purposes, we will focus on rate of climb and assume that the requirement calls for a climb rate of greater than 2 meters per second (m/s) at 2,000 meters.

Defining Vehicle Geometry and Determining Aerodynamic Characteristics
The aircraft's geometrical configuration determines its aerodynamic characteristics, and therefore its performance and handling qualities. Once the geometric configuration is chosen, the aerodynamic characteristics can be obtained by means of analytical prediction, wind tunnel testing of the scaled model or a full-sized prototype, or flight tests.
While wind tunnel tests and flight tests provide high-fidelity results, they are expensive and time- consuming, as they must be performed on the actual hardware. These methods are best used when the aircraft's geometry is finalized. Analytical prediction is a quicker and less expensive way to estimate aerodynamic characteristics in the early stages of design.
We will use Digital Datcom, a popular software program for analytical prediction developed by the U.S. Air Force as a digital version of its Data Compendium (DATCOM). This software is now publicly available and can be downloaded from several Web sites.
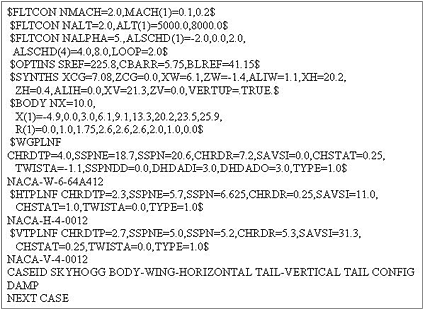
We first create a Digital Datcom input file that defines the geometric configuration of our aircraft and the flight conditions that we will need to obtain the aerodynamic coefficients (Figure 2).
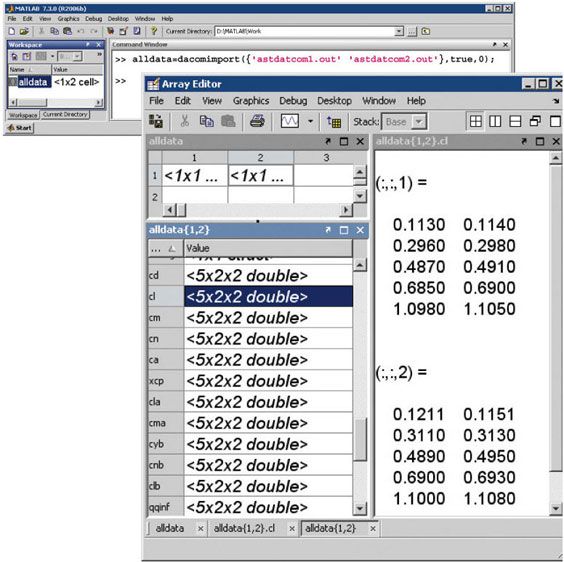
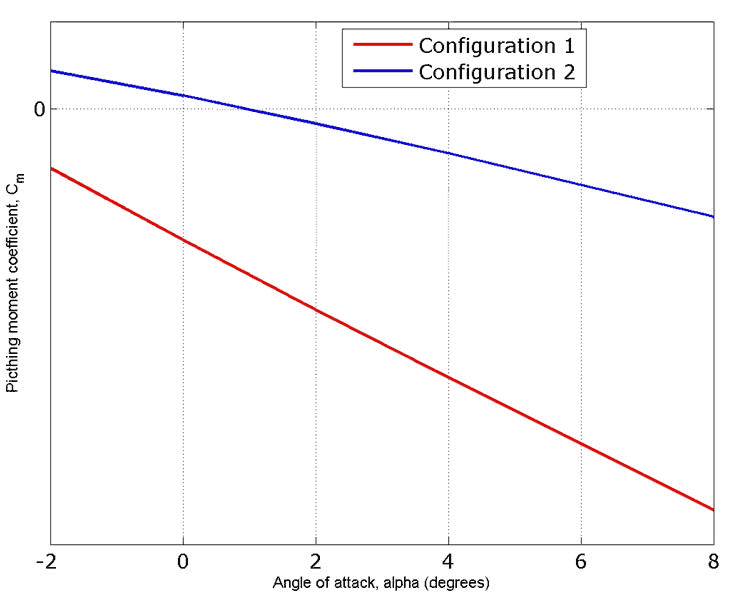
Flight control engineers can gain insight into the vehicle's geometric configuration by examining stability and control derivatives—easy to do once those metrics are imported into MATLAB. In our example, we need to check whether the vehicle is inherently stable. We do this by checking whether the pitching moment described by the corresponding coefficient, Cm, provides a restoring moment for the aircraft. A restoring moment tends to return the aircraft angle of attack to zero.
In configuration 1 (Figure 4), Cm is negative for all angles of attack, which means that this configuration will not provide a restoring moment for negative angles of attack and will not provide the flight characteristics that we are looking for. Configuration 2 fixes this problem by moving the center of gravity forward. A restoring moment is available for most angles of attack.
Simulating the Flight Vehicle
Once we have determined aerodynamic stability and control derivatives, we build an open-loop plant model. A typical plant model includes the following components:
- Equations of motion, which calculate vehicle position and attitude based on forces and moments acting on the vehicle
- Forces and moments, which calculate aerodynamic forces and moments acting on the vehicle, as well as gravity force and thrust
- Actuator positions, which calculate actuator displacements based on actuator commands
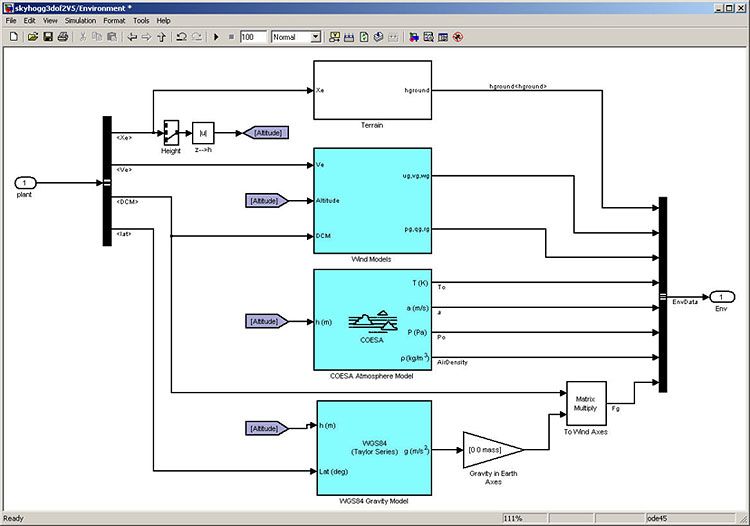
- Environment, which simulates environmental effects, including wind disturbances, gravity, and atmosphere
- Sensors, which model the behavior of the measurement devices that provide inputs to the control laws
We can implement most of this functionality using Aerospace Blockset.
In our example, we first want to evaluate the aircraft's longitudinal dynamics. We begin by building an equations-of-motion model using a 3DOF block from the Equations of Motion library in Aerospace Blockset (Figure 5). This model will help us determine whether the flight vehicle is longitudinally stable and controllable. We design our subsystem to have the same interface as a six degrees-of-freedom (DOF) version. Once we are happy with three DOF performance, stability, and controllability, we can easily implement the six DOF version, iterating on the other control surface geometries until we achieve the desired behavior from the aircraft.
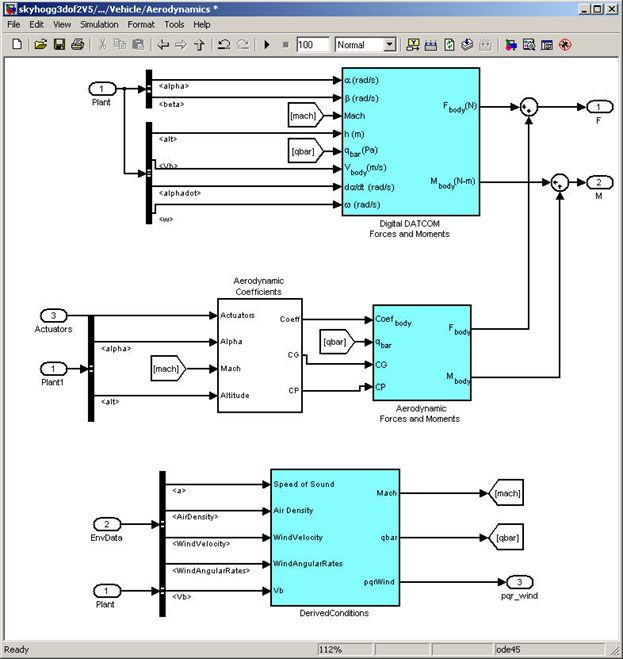
To calculate the aerodynamic forces and moments acting on our vehicle, we use a Digital Datcom Forces and the Moments block from Aerospace Blockset (Figure 6). This block uses a structure that Aerospace Toolbox creates when it imports aerodynamic coefficients from Digital Datcom. As a result, we do not have to create multiple look-up tables and then combine their outputs.
We also use blocks from Aerospace Blockset to create actuator, sensor, and environment models (Figures 7, 8, and 9, respectively).
In addition to creating the parts of the model described above, we must ensure that we convert from body axes to wind axes and back correctly. We use standard blocks from Aerospace Blockset to do this.
Once the model is complete, we can show it to colleagues, including those who do not have Simulink, by using Simulink Report Generator to export the model to a Web view. A Web view is an interactive HTML replica of the model that lets you navigate model hierarchy and check the properties of subsystems, blocks, and signals.
Designing the Flight Control Laws
Once we have created the plant model in Simulink, the next step is to design a longitudinal controller that commands elevator position to control altitude. The traditional two-loop feedback control structure chosen for this design (Figure 10) has an outer loop for controlling altitude (compensator C1) and an inner loop for controlling pitch angle (compensator C2).

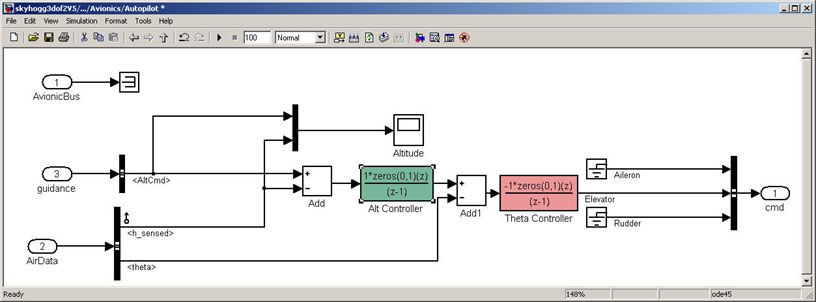
Figure 11 shows the corresponding controller configuration in our Simulink model.
With Simulink Control Design we can tune the controllers directly in Simulink using a range of tools and techniques.
Using the Simulink Control Design interface, we set up the control problem by specifying two controller blocks, closed-loop input and output signals—altitude command and sensed altitude, respectively—and the steady-state or trim condition.
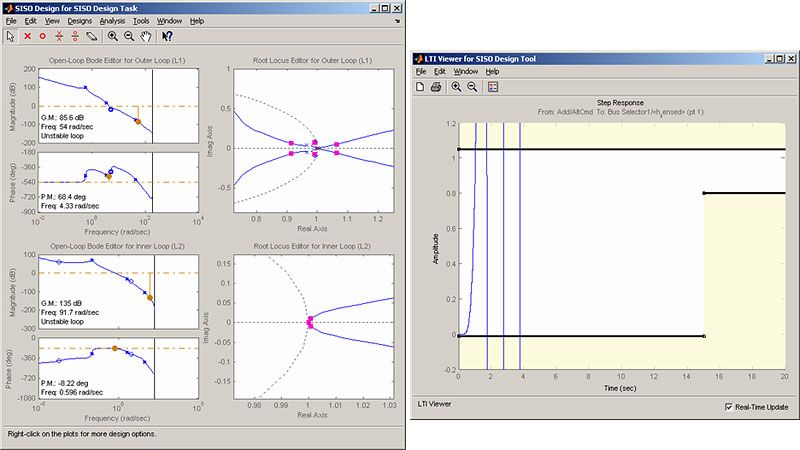
Using this information, Simulink Control Design automatically computes linear approximations of the model and identifies feedback loops to be used in the design. To design the controllers for the inner and outer loops, we use root locus and bode plots for the open loops and a step response plot for the closed-loop response (Figure 12).
We then interactively tune the compensators for the inner and outer loops using these plots. Because the plots update in real time as we tune the compensators, we can see the coupling effects that these changes have on other loops and on the closed-loop response.
To make the multi-loop design more systematic, we use a sequential loop closure technique. This technique lets us incrementally take into account the dynamics of the other loops during the design process. With Simulink Control Design, we configure the inner loop to have an additional loop opening at the output of the outer loop controller (C1 in Figure 13). This approach decouples the inner loop from the outer loop and simplifies the inner-loop controller design. After designing the inner loop, we design the outer loop controller. Figure 14 shows the resulting tuned compensator design.

There are several ways to tune the controller in Simulink Control Design. For example, you can use a graphical approach, and interactively move controller gain, poles, and zeros until you get a satisfactory response (Figure 14). Additionally, you can use Simulink Response Optimization within Simulink Control Design to tune the controller automatically. After you specify frequency domain requirements, such as gain margin and phase margin and time domain requirements, Simulink Response Optimization automatically tunes controller parameters to satisfy those requirements. Once we have developed an acceptable controller design, the control blocks in the Simulink model are automatically updated.
We run our nonlinear simulation with flight control logic and check that the controller's performance is acceptable. Figure 15 shows the results from a closed-loop simulation of our nonlinear Simulink model for a requested altitude increase from 2,000 meters to 2,050 meters. Even though a pilot requests a step change in altitude, the actual controller altitude request rate is limited to provide a comfortable and safe ride for the passengers.
We can now use these simulation results to determine whether our aircraft design met its performance requirements. The requirement called for the climb rate to be above 2 m/s. As we can see, the aircraft climbed from 2,000 to 2,050 meters in less then 20 seconds, providing a climb rate higher than 2.5 m/s. Therefore, this particular geometric configuration and controller design meet our performance requirements. If we had not met the requirements, we would have to redesign our controller or change the geometric configuration of the aircraft.
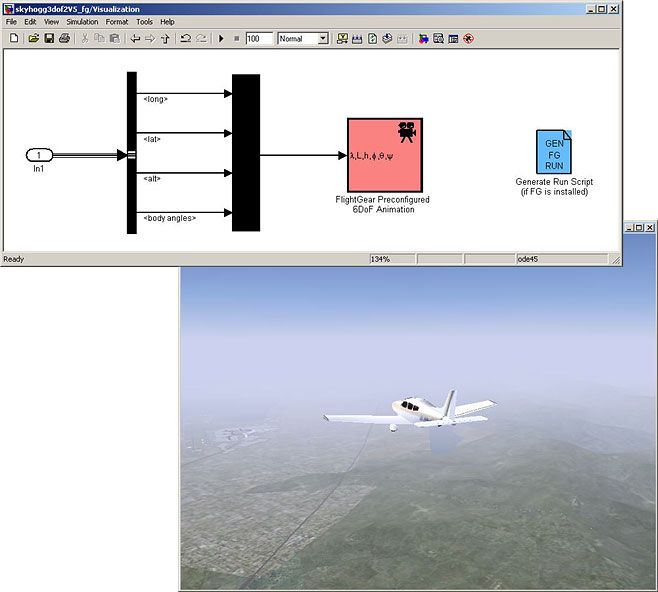
In addition to traditional time plots, we visualize simulation results using the Aerospace Blockset interface to FlightGear (Figure 16).
We can also use the Aerospace Toolbox interface to FlightGear to play back MATLAB data-either simulation results or actual flight test data.
Completing the Design Process
The next steps involve building a hardware-in-the-loop system, building the actual vehicle hardware and software, conducting the flight test, and analyzing and visualizing the flight test data. As these steps are not the focus of this article, we will not describe them here. Instead, we will simply mention that they can all be streamlined and simplified using the appropriate tools, such as Embedded Coder, Simulink Real-Time, Simulink Check, Simulink Coverage, Requirements Toolbox™, and Aerospace Toolbox.
Summary
In this article we showed how you can rapidly develop the initial design of your flight vehicle and evaluate different geometric configurations using Digital Datcom and Aerospace Toolbox. You can then rapidly create a flight simulation of your vehicle using Simulink and Aerospace Blockset and design flight control laws using Simulink Control Design. This approach enables you to determine the optimal geometrical configuration of your vehicle and estimate its performance and handling qualities well before any hardware is built, reducing design costs and eliminating errors. In addition, using a single tool chain helps facilitate communication among different groups and accelerates design time.
Published 2007
References
-
Cannon, M, Gabbard, M, Meyer, T, Morrison, S, Skocik, M, Woods, D. "Swineworks D-200 Sky Hogg Design Proposal." AIAA/General Dynamics Corporation Team Aircraft Design Competition, 1991-1992.
